Ataraxion Application
Dec. 10th, 2013 11:57 amP L A Y E R I N F O R M A T I O N
Your Name: Daisy
OOC Journal:![[personal profile]](https://www.dreamwidth.org/img/silk/identity/user.png) cherrycandies
cherrycandies
Under 18? If yes, what is your age?: 19 :P
Email + IM: cherrynaked@ymail.com + N/A
Characters Played at Ataraxion: Ellis (Left 4 Dead 2)
C H A R A C T E R I N F O R M A T I O N
Name: Norman Jayden
Canon: Heavy Rain
Original or Alternate Universe: Original
Canon Point: Right near the end, in which Ethan saves Shaun and Norman kills the Origami Killer on the rooftop. Directly after the killer's death.
Number: Random is fine :)
Setting: http://heavyrain.wikia.com/wiki/Norman_Jayden
History: Let it be known before I write this section that due to the cancellation of the Heavy Rain Chronicles, there is ABSOLUTELY NO INFORMATION regarding Norman's life before the Origami Killer case. However, it is implied in the 'Uploaded' ending (in which Norman dies from his Triptocaine/ARI abuse) that he has no family or close friends.
Agent Jayden is called in from Washington D.C. to assist with the Origami Killer case. The Origami Killer has killed eight boys aged from nine to thirteen in the last three years by drowning them in rain water and the local police have finally requested the assistance of the Bureau. Each victim has been found in a different vacant field or lot with an orchid on their chest and an origami dog in one hand three to six days after their abduction. All the victims have been taken in broad daylight, yet no one has seen a thing. An FBI profiler, Norman is here to - what else? - profile their serial killer in an attempt to identify him before he kills another child. Jayden initially notices that the victims were all found next to railroad tracks but later discovers that the killer was only leaving them there to misdirect the police and point the investigation in a different direction.
At the dump site of the Origami Killer's most recent victim, Jayden meets up with Lieutenant Carter Blake. The two clash immediately but work together throughout the remainder of the case. After the initial introductions are made, Jayden searches the crime scene and leaves with footprint scans, blood samples, and tire track scans, as well as the type of vehicle the killer is driving. A Chevrolet Malibu '83.
When searching crime scenes, Jayden uses an experimental system called ARI (Augmented Reality Interface), which consists of a pair of sunglasses and a glove that allow him to scan the area and do DNA analysis as well as analyze substances and shoe prints immediately rather than taking samples with him to a lab and waiting for the results. ARI also stores all of this information as well as case files and files on a crime's victims.
ARI is a very effective system as far as forensics is concerned, but it takes a serious toll on Norman's health. If he stays in the digital world of ARI for too long, it causes bleeding of the eyes, visual hallucinations, and eventually can lead to death. Most of the effects can be avoided by lessening or discontinuing the use of ARI, but the hallucinations can only be controlled by taking the drug Triptocaine. Triptocaine, commonly called Tripto, is a euphoric drug that is taken by insufflation (snorting) and which comes with its own set of side effects.
Norman originally started using Tripto to help combat the effects of ARI, but it is painfully obvious that he now abuses both the drug and the ARI system and is heavily dependent on both of them. Though the specific effects of the drug are never made clear in-game, it is shown to cause nose bleeds and eventually can lead to death. Triptocaine causes both mental and physical addiction and its withdrawals are extremely severe. Withdrawal symptoms include blurred vision, increased heart rate, shaking hands, tremors, aggressive behavior, pain, dehydration, disorientation/vertigo, and feelings of extreme anxiety.
After thoroughly searching the crime scene, Agent Jayden heads to the police headquarters, where he meets up with Captain Perry, the head of the homicide division. After flubbing an attempt to help the man with his tie, we're off to find Charlene, who will show us to Norman's 'office'. Complimenting the gold watch on her desk, Norman is informed that it's a gift for one of the cops who's just gotten a promotion. The police force gives everyone who is promoted to Lieutenant the same watch. Same color, same model. Dropping a five dollar bill in the donation basket, he asks Charlene to help him find his office.
The 'office' is really just a large closet with a desk in the center and the word 'Office' stenciled on the door. Clearly irritated with the dusty little room, Norman shoves the desk up against the wall, even though he isn't going to be looking at it, and heads into ARI, where he chooses a virtual office theme that apparently suits him much better. The forest. After reviewing the evidence and compiling a tentative profile, he closes ARI and proceeds to have a Triptocaine withdrawal. Determined to resist, Norman clasps his shaking hands together in an attempt to appear nonchalant and heads for the restroom. Once there, he stumbles over to the sink and douses his face with cold water. Whatever it takes, he's not going to give in to the urge this time.
Meanwhile, Ethan Mars comes into the police station stating that his son has gone missing. They were at the park, his son Shaun was on the carousel, and then he simply vanished. Agent Jayden, leaving the restroom a much less disheveled man and now in control once again, hears his statement and assists in taking down the information he provides. When they're through speaking to him, it is clear to everyone that Shaun is indeed the latest intended victim of the Origami Killer.
Now we go on our way to deliver Norman's working profile to the Origami Killer task force. Norman tells the men and women on the case all he has found out from working the crime scene, explaining everything calmly and professionally, even as he is constantly called out and challenged by Lt. Blake. Toward the end of his presentation, he reveals that he noticed something new about the killings. Between the kidnapping and death of each victim, the amount of time varies but one thing doesn't. The rain. Each time a victim dies, there has consistently been six inches of rain since their kidnapping. With that taken into account, they only have seventy-two hours to save Shaun Mars.
Later, Jayden goes with Blake to check out a lead at the apartment of a man named Nathaniel Williams. Norman thinks Nathaniel Williams fits the profile and Blake is just determined to nail a suspect and get this over with as soon as possible. When they arrive at the apartment, it is clear that Nathaniel is not home. Rather than waiting or coming back with a warrant, Blake kicks the door down and enters the apartment illegally. Norman is upset about the action, reprimanding the lieutenant but then going in with him anyway. The apartment is covered in crucifixes and pictures of Jesus Christ, clearly the home of a very paranoid man. The two look around for a few minutes, finding nothing, before a shaken Nathaniel Williams steps through the door. The man drops his grocery bags on the floor, stepping back away from Blake with a terrified look on his face. It's clear that they've met before.
Norman begins speaking to the man, asking him general questions about himself and trying to calm him. But it's not long before Blake steps in, yelling and intimidating the man, who refers to him as the son of Satan. Upset with the blatant brutality, Norman intervenes, telling Blake to knock it off and defending the man. Until Nathaniel pulls a gun from his pocket and aims it at Blake's head. Jayden then draws his own firearm, locking the sights onto Nathaniel but reluctant to shoot. Eventually, he talks the man down, telling him that Blake is going to leave the planet and return to the Realm of Shadows, that he can't hurt him. Nathaniel drops the gun and Blake walks over to handcuff him. As he reaches the suspect, Nathaniel whirls around holding what looks to be a second weapon but is in reality a wooden cross. Remaining (slightly less than) calm, Jayden doesn't pull the trigger, which proves to be the right decision, as the man is not holding a gun.
After arresting the man and bringing him in for questioning, they're already off to see another suspect: Miroslav Korda. They confront Korda on the sidewalk outside of a supermarket. Blake approaches him by introducing himself and telling him that he'd like to ask him a few questions. Korda's response is to throw his coffee into Blake's face and make a run for it. Norman attempts to stay and make sure Blake is alright (because we all know about all those tragic coffee fatalities) but the lieutenant orders him to chase the suspect.
Norman is hot on the trail as Korda runs inside the market and attempts to escape in the confusion. Knocking over nearly everything and everyone in his clumsy path, Norman corners the man in a large walk-in meat locker. After much stumbling and falling to the ground, he finally has his man. Right? Not quite. As Norman looks around for him amongst the carcasses hanging from the ceiling, Korda lunges at him from the side, throwing him off balance once again. Norman fights the man and eventually ends up with the upper hand, knocking him to the floor and subduing him. As Norman keeps the suspect down, Blake recovers from the coffee to the face and walks into the room, ratcheting cuffs on Korda's wrists and leading him out the door.
They bring Korda back for questioning but find that he has solid alibis for more than one of the killings. He ran because he missed a meeting with his parole officer, not because he's been killing children. This enrages Blake but his manly tantrum is cut short when Ethan Mars' ex-wife Grace comes into the police station with some alarming information. She tells them that Ethan had once come home soaked with rain, speaking nonsense about drowning, rain, bodies in the water. And, according to Grace, another body was found the next morning.
Blake is content to arrest Ethan and charge him with the murders but Norman is convinced that he is innocent. He doesn't fit the psychological profile or the geoprofile (which tells the zone where the killer most likely lives). He thinks there's no way Ethan, a devoted father, would murder eight children and then go on to kidnap his own son. But with no other remaining leads, Blake and Captain Perry are unwilling to consider the FBI agent's protests.
Determined to nail Ethan, Blake brings Norman along with him to the suspect's therapist's office. When they arrive, they find the therapist, Clarence Dupre, unwilling to break his vow of doctor-patient confidentiality and tell the men anything that Ethan has ever said to him during a session. Though he's still adamant that Ethan is innocent, Norman assists Blake in trying to get the man to talk to them. Until Blake gets violent, that is. He punches Dupre in the face before shoving him hard enough to send him over the desk and onto the ground.
At this point, Norman defends the beaten man, shouting at Blake and shoving him away from the therapist. Norman demands that they leave, but at that point Dr. Dupre is finally willing to talk. He confirms what Grace told them, as well as showing them something that fell from Ethan's pocket as he was leaving from his latest session. An origami dog.
The information shared by Grace and Dupre send Ethan Mars shooting up to the top of the suspect list, and Norman and Blake are soon on their way to arrest Ethan at a seedy place by the name of the Cross Road Motel, though Norman is still unconvinced of Ethan's guilt. They follow Ethan to an apartment building on Marble Street, where they set up to catch him when he comes out. They see a young woman with short brown hair enter the building but think nothing of it, assuming she's a tenant. After some time, Blake gets tired of waiting and decides that they should go in and make the arrest inside the building.
As they enter the building, they see the woman who had entered earlier escaping out the window with Ethan Mars. Assuming she must have been an accomplice of Ethan's, they give chase. The pair runs toward a bustling subway entrance and it looks like they are going to get away. Or one of them is. When they're almost at the entrance, the officers have them surrounded. Panicking, the young woman abandons Ethan and runs into the crowd while the cops and Jayden are focused on Ethan.
As the woman escapes, they are able to successfully apprehend Ethan and bring him back to the station for questioning. It's Norman that conducts the interrogation of Ethan Mars. Mars remains silent for nearly the entire session, until he looks up from the metal table and tells Norman and Blake that, yes, he is the Origami Killer. He explains that he kidnapped his son but he doesn't know where he is, and the only way Shaun can be saved is if they release him so he can save the boy himself.
Blake, in a fit of rage at the ridiculous explanation, proceeds to punch Ethan in the face. Jayden protests, shouting at the man and trying to get him to stop beating the suspect. When that proves ineffective, he shoves Blake across the room, punching him. At this point, Blake pulls a gun on Norman, threatening to kill him if he doesn't get the hell out of the interrogation room. Furious, he hurries off to inform Captain Perry about Blake's unnecessary and very illegal brutality. Storming into the man's office, he tells him what happened (leaving out the fact that Blake threatened to shoot him in the face) and is horrified when the captain shrugs it off and refuses to do anything about it.
Storming back out of the man's office, he then heads into his own and slams the door, which only flies open once more until he shoves it closed and leans against it with his weight on his hands. Feeling that there's no more he can do for Ethan without the backup of the captain (if he doesn't want to get shot, that is), Norman sits down at his desk and delves once again into the digital world of ARI. He spends some time reviewing the evidence in his possession and finds that the Chevrolet Malibu '83, whose tire tracks he found at the crime scene, was reported stolen by a man named Jackson Neville, AKA Mad Jack. The charges were dropped for lack of evidence, but it still sounds like a pretty good lead.
He's about to leave his office and follow up on the Mad Jack lead, but as he reaches the door, he finds himself overcome by a crippling Triptocaine withdrawal. He does his best to control it but gives in, inhaling the blue powder and finding intense relief in it. Finally making it out of his office, he heads back toward the interrogation room. Opening the door, he finds Ethan Mars unconscious on the floor and still handcuffed to the table. Blake is gone but there's a police officer guarding Ethan. Telling the officer to leave them alone, he kneels beside Ethan, stroking his hair and asking him if he's alright before helping him back into his chair. Ethan tells him that he has to get out of there if he's going to save his son. Jayden assures him that he'll do whatever he can to get him out and then leaves to figure out a plan.
Well aware that no one is going to believe him about Ethan's innocence, Norman heads into the room adjacent to the one Ethan is in. Looking through the two way mirror leading into the room, he sees that the guard has once again joined Ethan in the interrogation room. Using the microphone on the desk, he tells the man to take a break; he'll take over the babysitter duty. The guard, of course, is fine with the idea of getting an early break and gladly leaves his post. Before exiting the office, the guard tells Norman that his handcuff keys are on his desk. Just in case he needs to adjust Ethan's cuffs.
Picking up a police poncho from the chair in the room, he walks over to the camera aimed at Ethan and turns it off. Heading out of the room, he walks over to the guard's desk; picking up the handcuff keys and slipping them into his pocket. Making his way back to the interrogation room, he closes the door behind himself and tells Ethan that he's going to get him out of here. Pulling the keys from his pocket, he reaches out to 'adjust' Ethan's cuffs. Unlocking them, he helps him up and gives him the poncho along with instructions to put it on.
He tells him that the guards are having a break and if he's careful, Ethan should be able to slip by unnoticed. Ethan doesn't know what to say in regards to Agent Jayden putting his career on the line to break him out of jail. Just don't say ehnethin. Jayden instructs, urging him out the door while there's still time.
Watching the man trudge out of the station, Jayden hopes he won't regret doing this. With Ethan freed, now he can focus on something that might actually help with the investigation, rather than interrogating someone he knows is innocent.
So now we're at Mad Jack's auto garage, hoping for a nice, simple interview with the guy. But that's not what we're getting. Jack is immediately defiant and refuses to answer any questions. After not too long, Jack heads off to junk some cars, leaving Norman alone in the garage.
Always his first reaction, Norman breaks out his ARI glasses and glove, slipping them on and having a look around the garage. He searches the entirety of the room and finds tire tracks that match the Malibu along with some blue paint that signifies that the car had indeed been in this garage. He also now knows what color of car he's looking for. As he's leaving the garage, ARI reveals a blood trail; lighting it up with its ultraviolet lights. Why would there be blood here? The trail leads to a tub in the corner that's filled with water. Lifting the cover from the tub, he sees a human skull floating in the water.
Appearing behind him, Jack pulls out a gun before Norman can get to his own, training it on the back of his head. They tussle and Norman manages to evade getting shot and turns the tables by aiming his gun at Jack, who falls to the ground against a stack of gasoline tanks. The man is still reluctant to talk until Norman threatens to shoot the gas tanks and blow the whole place to pieces. He'll just say it was an accident, he says. His tone is a bit crazed and this apparently scares Jack into telling him what he wants to know.
Jack admits that, yes, the car was here. He got it from 'a guy' and then later gave that guy a different car with false plates. But he doesn't know his name. He then tells Norman that he was supposed to tell a guy named Paco when the car was finished. Paco is the owner of the Blue Lagoon Night Club, he informs. Armed with all the information he needs to move on in the case, he moves to make an arrest on Jack but just then is stricken by another Tripto withdrawal. Vision blurring, he feels disoriented and lets the phial of the illicit drug slip to the ground, then falls down himself. With the agent already on his knees, Jack mocks his addiction before giving him a hard kick that sends him the rest of the way down. A second kick, to the head this time, knocks Norman into unconsciousness.
When he wakes up, Norman finds himself handcuffed to the steering wheel of his own car being lifted by a large machine. It's headed toward a car crushing machine with terrible threshing blades designed to tear apart metal. Norman doesn't stand a chance against it. Thinking quickly, he kicks open the glove compartment and gets hold of his secondary weapon, which he always stores there. Clumsily getting his finger around the trigger, he shoots the chain that binds him to the steering wheel and manages to make it through the broken out car window to safety just in time to avoid a gruesome death.
Finally, he's safe. But, wait: Jack's back! Jack comes at him and Norman has no choice but to fight back. The man kicks him to the ground and doesn't stop kicking. Norman manages to get hold of a piece of a destroyed car, throwing it at Jack before getting to his feet. Jack then gets him shoved up against a moving construction vehicle. In the midst of the fight, Norman gets away from it and the strap of Jack's undone coveralls gets stuck in the wheel of the machine. Norman watches without attempting to help as the man is fatally crushed under the continuous track wheel.
Following the lead given to him by Mad Jack, Norman then heads off to the Blue Lagoon Night Club to see Paco. He looks terribly out of place there and it's very awkward for everyone. When he first confronts the bouncer about seeing Paco, the man refuses. It's only when Norman shows him his FBI badge that he tells him where Paco can be found and lets him through. Crossing the crowded dance floor proves minorly difficult and he's relieved to reach the stairs on the opposite side of the club. He heads upstairs and reveals his badge once again to the man at the top of the stairs.
Walking down the short hallway to Paco's 'office', he opens the door and sees Paco sitting in a swivel chair facing away from him. Heading over to him, he turns the chair around to get a look at the man's face. Oh no, he's dead! The man has been shot once right between the eyes. Instant death. Disgruntled by the dead end (ha!) that has left his lead useless, he puts on his ARI glasses and turns to look around the room.
But, oh no! The killer's still here! He pounces from his hiding spot behind the door and attacks Norman, knocking the ARI specs as well as Norman's gun to the floor, before drawing a pistol of his own. Norman gets the gun away from him, dropping it, too, to the floor, and then proceeds to fight back with his fists. The killer reaches up and grabs a katana from a wall display, slashing at Norman with it and drawing blood before the agent manages to knock it from his hand. They fight hand to hand until the killer knocks Norman into a wall mounted fish tank, sending water, fish, shards of glass, and Agent Norman Jayden sloshing onto the floor. The killer escapes while Norman is trying to get up, but the agent notices that he managed to rip the pocket off of the man's jacket in the struggle.
He picks up the two receipts that fell from the man's pocket (both from the same gas station) and follows the killer out the door. By the time he gets out there, the man is nowhere to be seen. Turning to the doorman, he asks him if Paco knew the man who had come to see him. The man refuses to answer but when Norman slams him up against the wall and intimidates him, he doesn't mind telling him what he wants to know. According to the doorman, the man is a friend of Paco's and he was told to always let him in without question. He also tells him that the man's name is John. That's all he knows.
Satisfied with the information, Norman heads back into the room (which is now a crime scene) and picks up his ARI glasses, sliding his fingers into the coolness of the corresponding glove. Scanning the scene with ARI, he finds DNA and fingerprints from a woman named Madison Paige. A journalist. Now, why would she have been here? Maybe she's a witness. Aside from the receipts, he doesn't find anything else that will be of any help. Finished with the scene, he heads out of the room and out of the Blue Lagoon.
Back at the office, it's time to put together all the information we've collected so far and try to catch the killer. Opening ARI, Jayden realizes that the glasses were recording during his fight with the killer. Analyzing the video, he notices that the man is wearing a gold watch. The same watch that was on display on Charlene's desk. Same color, same model. He's disgusted to realize that the killer is, or was at one point, a cop. His first thought is that it must be Lt. Blake. That seems like a good explanation for his eagerness to nail Ethan Mars even with such a lack of evidence. He considers making an accusation but decides it would be better to look at the rest of the evidence before doing something like that. He has to be sure before he says anything. He then analyzes the receipts, finding no fingerprints or relevant purchases. Disgruntled, he thinks he might have hit a dead end. But then an idea comes to him.
Geoanalyzing the receipts (determining the location of the gas station they were bought from), he finds out where the gas station is located. Then he cross-analyzes the location with the residences of all current and former police officers in the city. There's only one within close proximity of the gas station. Scott Shelby. He looks into his records and finds out that he owns a warehouse near the docks. He stops to think. If he's wrong, there won't be enough time to save Shaun Mars. With no other leads to go on, he goes with his gut and heads out to the warehouse. On the way, he gets a call from Madison Paige - the journalist whose fingerprints he found in the recently deceased Paco's office. She tells him that she knows who the killer is and gives him an address (the same information he just figured out himself) but doesn't tell him how she knows it. Confused but now confident that he's headed in the right direction, Norman makes for the warehouse.
When he arrives, he sees Scott Shelby aiming a gun at - wait, what? - Ethan Mars. Ethan is facing away from him, trying desperately to open a metal grate covering a carved well in the floor. The area is open to the sky and the relentless autumn rain beats down on them. Oh, shit! Shaun must be in that well! With no time to think or make a rational decision, Jayden leaps on Shelby, tackling him to the ground and knocking the gun from his hand. Shelby is up quickly and getting away, but at least Ethan's safe. But don't worry, Origami's not going to get away that easily.
Jayden is in pursuit as soon as he's on his feet, following Shelby to the roof. Looking around in the heavy rain, he sees no sign of the killer and decides to step out onto a two foot wide shaft extending over the side of the building (for some reason). But, wait! The killer is right behind him, tackling him to the ground and knocking both of them over the side of the shaft. They land on a moving conveyor belt that's dropping rubble into a giant crushing machine (seriously, another one?).
Sans pistol, Norman fights the killer hand to hand, careful not to fall off the edge of the conveyor. A fall from this height would mean death, and the threat is looming throughout their scuffle. He falls on his back, picking up various pieces of rubble and metal and throwing them at his attacker. Nearing the end of the belt, Norman manages to get to his feet and climb onto one of the platforms on either side after throwing yet another piece of rubble at Shelby. The blow knocks the killer off of the platform and he's holding on with one hand as Norman makes it to safety. The Origami Killer begs Norman to help him up, to save him from the promised death below. Jayden nearly extends a hand to the pleading man but changes his mind, letting him fall into the crushing blades of the machine below. Staring at the now bloody blades, he feels relief wash over him. The Origami Killer is dead.
And now this.
Personality: Norman Jayden is a very confident man. He never second guesses or doubts himself, instead going about nearly everything with his head held high and his opinions stated openly. When he gives his working profile to Captain Perry and the Origami Killer task force, he speaks fluidly and informatively. With the life of a ten year old boy depending on his profile, Jayden is still completely sure of himself. He's done his research and finds no reason to doubt himself. He gives off a general air of confidence and esteem without having to say a thing. His effortless confidence and esteem have nothing to do with his Triptocaine addiction, as he acts this way regardless of whether he indulges in the drug or not. Whether he has just taken the drug or refrained every time the option is given to him, this aspect of Norman Jayden is the same.
Despite his confidence, Norman has a distorted self-image. His addiction causes him to be slightly less confident than he would otherwise be, as shown by the fact that he avoids looking in mirrors. This behavior is typical of addicts who are aware of the damage their vices are causing to both their physical and mental wellbeing. All other playable characters, when given the option to look in the mirror, will look at their reflections and seem to approve of their overall appearance. If placed in front of a mirror, as he is in the police station if the player chooses to enter the restroom, Norman will look off to the side, glancing at anything in the room other than his own reflection. This falter in his overall confidence is caused solely by his addiction to Triptocaine.
He is also rational, thinking things over in his head before making decisions (if possible). He considers every option before acting on one. When he first realizes that the killer is a cop, his first instinct is that it must be Carter Blake. It all makes sense and adds up perfectly. Also, they're getting desperate and running out of time to save Shaun. But, still, he decides to review the rest of the evidence before making a claim. It turns out he was wrong, and if he'd made the claim on impulse like he was about to, they may not have been able to get to Shaun in time. Due to his sensible decision making, he was able to assist Ethan in saving Shaun and stopping the Origami Killer. He also avoids killing Nathaniel because he represses the natural urge to pull the trigger, instead waiting until he understands the situation before doing anything he might regret. Having this attitude prevents him from killing an unarmed man in his own home. Norman’s rationality has nothing to do with his use of Triptocaine. The drug helps to keep his mind clear but does not affect his rational decision making skills. This is clear, as most of the major decisions made in the game are made by the player, and therefore may vary by player or even by playthrough. The same options are available whether Triptocaine is taken every time or not at all.
Norman also has a very addictive personality. This is shown by his crippling addiction to both Triptocaine and ARI. He abuses them greatly, to the point that he's near death. This is shown in gameplay during the last ARI session before going to the warehouse. If he remains in ARI for too long during this time, he will die from the overuse. In the Uploaded ending (which is achieved if Norman dies at any point in the game other than Smoking Mirror), Norman appears in ARI when the system is used by Lieutenant Blake. This shows that his ARI addiction is so severe that he has been literally uploaded into the program. As far as Triptocaine goes, he tries to resist the cravings but they still continue to get the better of him. He sometimes has to physically force himself not to take it, and even that doesn't always work. He is heavily dependent both mentally and physically on the drug, which is shown by the sheer intensity of his withdrawals. His hands shake uncontrollably and he can barely stand up, (these along with the symptoms listed in the History section). The true extent of his addiction is shown in the Smoking Mirror ending, in which he dies from a Triptocaine overdose after failing to save Shaun Mars. It shows that he’s so close to the edge that one serious failure is enough to send him over it.
Jayden feels little connection to the real world, preferring instead the virtual world of ARI. Whenever he has a moment of free time or time to himself, he spends it inside the ARI world. When waiting for Captain Perry after he searches the first crimes scene, he enters ARI to do something as unentertaining as throwing a virtual ball at a virtual brick wall. This is something that could easily be done in the real world but he still prefers to reside inside of ARI. He's gone so far as to make friends with a virtual figure. In the chapter "Jayden Blues", he is seen playing a grand piano and having a conversation with a butler. This is basically the only not completely work-related conversation he has during the game and he seems very comfortable with the digital man. The butler brings him vodka, insinuating that Norman had previously asked for it. Doing things like drinking alcohol whilst inside a virtual world shows a sort of comfortable dependence on it. Alcoholic beverages consumed in ARI would have no effect on him in the real world and yet he still indulges in them. He treats ARI as if it's the real world rather than a simple filing system as it should be seen. Triptocaine helps to dull the effects of ARI, which makes it easier for Norman to ignore the damage the system is doing to his physical and mental health. The drug helps to eliminate the hallucinations caused by overuse of ARI, therefore making it possible for him to deny the ill effects and continue his excessive use.
Norman has a strong moral sense. He would much rather do what's right and what will best help with his work than what's legal. He risks everything - his career, and quite possibly his freedom - to break Ethan Mars out of the police station because that's what he feels is the right thing to do. He believes that it's the best way to save Shaun Mars and he barely has to hesitate before putting his plan to action. There's no guarantee that Ethan was even telling the truth about being able to save Shaun, but Norman goes with his gut. His instincts and moral capabilities are in the end what saves Shaun's life. It goes without saying that Norman’s moral values come from the core, and have nothing to do with his drug use. He knows what’s right and will act on those impulses regardless of their legality or consequences.
There is no end to Norman's impatience. He needs near constant stimulation to remain entertained and that stimulation usually comes from ARI. When he's waiting to meet with Captain Perry for the first time, he sits outside the man's office for no more than five minutes and boredom is already overtaking him. He has a few little habits that come up when he's bored or has to wait for something. He makes an array of irritating sounds with his mouth, crosses and uncrosses his legs, and nearly constantly shifts from one position to another. After a few minutes, he escapes into ARI. The real world holds little for Norman Jayden. His impatient nature has nothing to do with Tripto, and is merely part of his collective demeanor. He is easily bored, which may be (or have been at one point) an excuse to take Triptocaine, but that is the only extent to which those two aspects of his life are linked. Tripto is not the cause for his impatience, nor is his impatience the reason he takes Tripto.
Norman is a very theatrical person, and he's not afraid to show his emotions. If he feels strongly about something or has a strong emotional reaction, everyone will know about it. When Blake is abusing Ethan during the interrogation, Norman gets angry enough to become physically violent with the man. Then when Blake pulls the gun and threatens Norman, he deliberately kicks one of the two chairs over, picking up the other one and throwing it across the room. His emotions sometimes get the better of him, such as in that situation, and can cause problems. His bursts of rage are characteristic of his personality, and not caused by Triptocaine. Any violent and/or enraged outbursts are controlled by the player and therefore cannot be completely a result of Triptocaine, as the option is present whether or not the player chooses to let Norman indulge in the drug. However, Triptocaine withdrawal does worsen his temper issues and make him more liable to have an outburst. The drug doesn’t cause his short fuse, but rather enhances it.
Agent Jayden is also a major workaholic. He doesn't eat or sleep until it becomes absolutely necessary while he's working on a case. Throughout the game Heavy Rain, all characters are shown doing things like showering, eating, sleeping, and generally going about their lives. But not Norman Jayden. The story takes place over several days and he never eats or sleeps, and is never doing anything besides working on the case. He doesn't have a single conversation or even thought (the player can check the characters' thoughts at any given time) that doesn't center around the investigation. It even comes up when he's talking to his good friend ARI butler. Triptocaine does not cause his obsessive nature when it comes to work, but it does help him keep a clear head while he’s doing it. Tripto withdrawals cause him to become disoriented and therefore cause his work to suffer. If he indulges in it, he can focus again and get back to catching killers.
Abilities, Weaknesses and Power Limitations: Strengths/Abilities: Profiling - Norman is an FBI profiler, so figuring things out about people comes naturally to him. It's not as if he could tell your favorite song just by looking at you or read your mind or anything, just good old fashioned profiling. It's easier for him to read people than it might be for some others.
ARI - He's skilled with the ARI system and can use it to his advantage, programming whatever he wants into it and pulling it up at any time. Might not qualify as an 'ability' but... there it is :P
Evidence/Crime Scenes - Norman is skilled at handling crime scenes and evidence. He can weed out anything that is unimportant and focus on relevant information and evidence that could help solve whatever case he's working on at a given time.
Evading - While Norman is terrible with combat, he's very good at dodging and keeping away from the blows of his opponents. That's the one thing that often keeps him from getting killed.
Strategy - Norman uses strategy to get himself out of unfavorable situations. When Mad Jack handcuffs him to his own steering wheel and attempts to dump the vehicle in the trash compactor, Norman uses his quick thinking and strategic skills to save himself by kicking open the glove compartment and getting his gun to shoot the chain that binds him to the car.
Improvisation - During fights and in general situations, Norman is very good at improvising. When he loses his weapon in a fight, he's quick to pick up any random object and use it to his advantage. Also, when breaking Ethan out of jail, he improvises by disguising him in a police poncho. He utilizes this skill in almost any situation possible.
Weaknesses: Combat - Norman is terrible with hand to hand combat. It's quite obvious that he's never actually done any field work prior to the Origami Killer case. He frequently drops his gun or gets it knocked from his hand by opponents. He rarely ever has the upper hand until the end of the fight, and that sometimes only happens by sheer luck. When he's fighting Mad Jack, he only wins because Jack gets caught in one of his machines and is crushed. The fight with the Origami Killer at the Blue Lagoon only ends because the man leaves while Norman is incapacitated.
Reality - Norman has trouble dealing with reality. He spends every possible moment in ARI rather than dealing with life head-on like a normal person. He uses it as an escape and something like a second home. He feels a lot more comfortable in his digital haven than in the real world and it's becoming increasingly unhealthy. If he spends too much time in ARI before he goes to the warehouse, he will die from the overuse. He's risking his life just to escape from a reality that holds nothing for him.
Addiction - A major weakness is his dependence on ARI and Triptocaine. He can't live a normal life anymore without them and it's taking a toll on his health. During his multiple Tripto withdrawals, he becomes pale and sickly looking. His vision blurs and he can barely walk if he doesn't satisfy the urge. He can't even function without the drug anymore. It also gets in the way of his job. He would have been able to arrest Mad Jack without much of a fight if it hadn't been for his sudden onset of withdrawal symptoms. We already delved into how much he cares about his job, and he even lets the drugs get in the way of that. Also, the withdrawals seem to happen more and more frequently throughout the story. Before he releases Ethan, he has a withdrawal. The incident with Mad Jack is less than an hour after that and he has yet another. This addiction is clearly getting out of hand. The ARI issue was already basically covered in the Reality portion.
Butterfingers - Norman has a bad habit of dropping things, especially things that are very important. In the fights with Miroslav Korda, Mad Jack, and the Origami Killer (in the Blue Lagoon as well as on the warehouse roof) he drops his gun. In the fight at the Blue Lagoon, he also drops his ARI glasses. And when he's trying to arrest Mad Jack he drops his vial of Triptocaine, which would have relieved the withdrawal effects and saved him from almost being crushed. Norman just can't hold onto anything.
Inventory: ARI glasses and glove, Triptocaine (3 vials), pistol, clothes, I guess that's really all he has...
Appearance: Brown hair, light green eyes, scar on right cheek, 5'9"-5'10" (according to wiki!) Here's some pictures!
Age: 34
AU Clarification: None :P
S A M P L E S
Log Sample: Raining. It was still raining. The sky was dull and gray with heavy clouds that completely obscured the sun. And the relentless rain continued to beat down on the window of his hotel room.
The small vial was nearly weightless in his trembling hand. Tiny and light, yet so significant. The slightly luminescent blue powder seemed to smile up at him from his sweating palm, enticing and just too easy to give into.
Sighing, Norman let his arm sag down between his knees, hand dangling limply in the air and barely clutching the vial. How had he let it get this bad? In the beginning, it was a perfect setup. ARI was a revolutionary system, but it had its flaws. Triptocaine dulled those flaws, sometimes outright getting rid of them. But he'd found that it took an increasing amount of the drug to rid him of the harrowing visions caused by the system. And so he took more. And more. More often until it was multiple times every day.
And then he'd realized that that wasn' even the reason he was doing it anymore. He hadn't had a hallucination in months, yet he still indulged in the drug day after day. And in ARI, too. At first it had been just a tool. Just a thing that made his and others' work more effective. But then he'd realized that there was more to be found in ARI than just evidenciary information. There was a whole world inside the program. A world much better than the one he had previously resided in solely. A world where he didn't have to spend all his time at work looking over pictures of dead bodies and bloody weapons. A world where outside of work he didn't have to be completely alone. A world that was friendly to him, unlike the cruel reality that he'd lived with for most of his life.
His parents had been kind, wonderful people, from what he remembered. The orphanage had been fine. Not perfect, but a moderately comfortable life. And then came the first loneliness. He'd left at eighteen, just like everyone else. He'd gone out into the world with no one to turn to and nothing to show for his life. A few months later had been college. During those four years the loneliness subsided and was replaced by roommates and parties, beer and studying. Then, with a psychology degree to show for it, it was over. And then came the Bureau. And the return of the loneliness.
And with the combination of those two things came the drug. Commonly used to combat the ARI effects at the time, it was practically handed to him. ARI and Triptocaine together created the perfect world for him. ARI whenever possible, and Triptocaine when his eyes started to bleed from the overuse of ARI. And then more Triptocaine when his nose started to bleed. When his hands started to shake.
He still loved that world he'd enveloped himself in but it was time to stop. He knew it was time to stop but he just couldn't handle life without an escape. He glanced across the room at his already packed suitcase. The Origami Killer was dead, the case was solved, and he'd be returning to Washington later that evening.
A knock at the door startled him, and he rose to answer it. Probably some hotel maid or room service kid.
But when he opened the door, it was neither of these options. "Ethan." He said, surprised to see him.
The man looked awkward, rubbing a hand over his dark brown hair. "Um, hello, Agent Jayden." He didn't seem to have anything else to say and Norman wondered what he was doing here. And how he'd figured out where he was staying, for that matter.
"Is there somethin' I can do for ya?" Norman's fingers drummed habitually on the doorjamb. He'd been in the ARI world playing his piano earlier and his fingers were still used to the motions.
The man looked like he wished he hadn't come and Norman wondered if something had gone wrong. "I just wanted to come by, and uh, say thank you. For everything." He smiled awkwardly, maintaining eye contact but with a bit of trouble.
"You don't have to thank me, Ethan." He responded, smiling back. "I was just doin' my job."
The man shook his head adamantly. "No, you did so much for me. For Shaun. Thank you."
Norman's smile warmed slightly. It was always nice to be recognized for the good things rather than the bad. "No problem, Ethan. How's Shaun?"
Ethan nodded, glancing past Norman into the room. It was a nice hotel room, paid for by the Bureau. "H's fine. Great, actually. He's out of the hospital and everything."
"Hey, that's great." Norman leaned against the doorjamb. "Do you wanna come in or ehnethin?"
"Oh, thank you, Agent, but I really can't stay." He paused, seeming guilty about not accepting the invitation. "Gotta get back to Shaun. He's with Grace right now, but... I really ought to be there, too."
Norman nodded, smiling again. "Yeah, wouldn't wanna keep the kid waiting."
"But, really, thank you so much for everything you did for us." He looked truly grateful.
"Really, it was no problem." He was slightly overwhelmed by so much gratitude. "You take care, now, alright?"
"We will." Ethan gave him one last smile before turning and heading off down the hall.
Norman watched him until he turned the corner leading to the elevators, then closed the door gently. He remained where he was for a moment, then walked back to the bed and dropped heavily onto it. Pulling the vial again from his pocket, he stared at it for a moment before getting up and walking into the bathroom.
Without much hesitation, he let the vial slip from his fingers and splash into the stagnant water that filled the bottom of the toilet. He hit the flusher and watched it disappear from view. There was good in this world, even if it was more difficult to notice. He smiled as he thought of Ethan and Shaun, no doubt grinning ear to ear just to be with each other right now. Maybe he could be happy in this world as well.
Heading back into the bedroom, he sat down on the bed and stared at the streaks of sunlight that leaked in through the rain-pelted window.
Comms Sample: [Video]
[Norman comes into view still wearing his ARI glasses. He smiles but in a more professional than friendly way.]
Good mahnin'.
[He greets in his hybrid accent.]
I'm lookin' for information, here. Tryin' to figure out how we all got here and why.
[Reaching up to his face, he removes the glasses, realizing that he still has them on. His eyes are red rimmed and he looks tired.]
If anyone knows ehnethin, I'd appreciate a little help here. Take care.
[End feed.]
Your Name: Daisy
OOC Journal:
Under 18? If yes, what is your age?: 19 :P
Email + IM: cherrynaked@ymail.com + N/A
Characters Played at Ataraxion: Ellis (Left 4 Dead 2)
C H A R A C T E R I N F O R M A T I O N
Name: Norman Jayden
Canon: Heavy Rain
Original or Alternate Universe: Original
Canon Point: Right near the end, in which Ethan saves Shaun and Norman kills the Origami Killer on the rooftop. Directly after the killer's death.
Number: Random is fine :)
Setting: http://heavyrain.wikia.com/wiki/Norman_Jayden
History: Let it be known before I write this section that due to the cancellation of the Heavy Rain Chronicles, there is ABSOLUTELY NO INFORMATION regarding Norman's life before the Origami Killer case. However, it is implied in the 'Uploaded' ending (in which Norman dies from his Triptocaine/ARI abuse) that he has no family or close friends.
Agent Jayden is called in from Washington D.C. to assist with the Origami Killer case. The Origami Killer has killed eight boys aged from nine to thirteen in the last three years by drowning them in rain water and the local police have finally requested the assistance of the Bureau. Each victim has been found in a different vacant field or lot with an orchid on their chest and an origami dog in one hand three to six days after their abduction. All the victims have been taken in broad daylight, yet no one has seen a thing. An FBI profiler, Norman is here to - what else? - profile their serial killer in an attempt to identify him before he kills another child. Jayden initially notices that the victims were all found next to railroad tracks but later discovers that the killer was only leaving them there to misdirect the police and point the investigation in a different direction.
At the dump site of the Origami Killer's most recent victim, Jayden meets up with Lieutenant Carter Blake. The two clash immediately but work together throughout the remainder of the case. After the initial introductions are made, Jayden searches the crime scene and leaves with footprint scans, blood samples, and tire track scans, as well as the type of vehicle the killer is driving. A Chevrolet Malibu '83.
When searching crime scenes, Jayden uses an experimental system called ARI (Augmented Reality Interface), which consists of a pair of sunglasses and a glove that allow him to scan the area and do DNA analysis as well as analyze substances and shoe prints immediately rather than taking samples with him to a lab and waiting for the results. ARI also stores all of this information as well as case files and files on a crime's victims.
ARI is a very effective system as far as forensics is concerned, but it takes a serious toll on Norman's health. If he stays in the digital world of ARI for too long, it causes bleeding of the eyes, visual hallucinations, and eventually can lead to death. Most of the effects can be avoided by lessening or discontinuing the use of ARI, but the hallucinations can only be controlled by taking the drug Triptocaine. Triptocaine, commonly called Tripto, is a euphoric drug that is taken by insufflation (snorting) and which comes with its own set of side effects.
Norman originally started using Tripto to help combat the effects of ARI, but it is painfully obvious that he now abuses both the drug and the ARI system and is heavily dependent on both of them. Though the specific effects of the drug are never made clear in-game, it is shown to cause nose bleeds and eventually can lead to death. Triptocaine causes both mental and physical addiction and its withdrawals are extremely severe. Withdrawal symptoms include blurred vision, increased heart rate, shaking hands, tremors, aggressive behavior, pain, dehydration, disorientation/vertigo, and feelings of extreme anxiety.
After thoroughly searching the crime scene, Agent Jayden heads to the police headquarters, where he meets up with Captain Perry, the head of the homicide division. After flubbing an attempt to help the man with his tie, we're off to find Charlene, who will show us to Norman's 'office'. Complimenting the gold watch on her desk, Norman is informed that it's a gift for one of the cops who's just gotten a promotion. The police force gives everyone who is promoted to Lieutenant the same watch. Same color, same model. Dropping a five dollar bill in the donation basket, he asks Charlene to help him find his office.
The 'office' is really just a large closet with a desk in the center and the word 'Office' stenciled on the door. Clearly irritated with the dusty little room, Norman shoves the desk up against the wall, even though he isn't going to be looking at it, and heads into ARI, where he chooses a virtual office theme that apparently suits him much better. The forest. After reviewing the evidence and compiling a tentative profile, he closes ARI and proceeds to have a Triptocaine withdrawal. Determined to resist, Norman clasps his shaking hands together in an attempt to appear nonchalant and heads for the restroom. Once there, he stumbles over to the sink and douses his face with cold water. Whatever it takes, he's not going to give in to the urge this time.
Meanwhile, Ethan Mars comes into the police station stating that his son has gone missing. They were at the park, his son Shaun was on the carousel, and then he simply vanished. Agent Jayden, leaving the restroom a much less disheveled man and now in control once again, hears his statement and assists in taking down the information he provides. When they're through speaking to him, it is clear to everyone that Shaun is indeed the latest intended victim of the Origami Killer.
Now we go on our way to deliver Norman's working profile to the Origami Killer task force. Norman tells the men and women on the case all he has found out from working the crime scene, explaining everything calmly and professionally, even as he is constantly called out and challenged by Lt. Blake. Toward the end of his presentation, he reveals that he noticed something new about the killings. Between the kidnapping and death of each victim, the amount of time varies but one thing doesn't. The rain. Each time a victim dies, there has consistently been six inches of rain since their kidnapping. With that taken into account, they only have seventy-two hours to save Shaun Mars.
Later, Jayden goes with Blake to check out a lead at the apartment of a man named Nathaniel Williams. Norman thinks Nathaniel Williams fits the profile and Blake is just determined to nail a suspect and get this over with as soon as possible. When they arrive at the apartment, it is clear that Nathaniel is not home. Rather than waiting or coming back with a warrant, Blake kicks the door down and enters the apartment illegally. Norman is upset about the action, reprimanding the lieutenant but then going in with him anyway. The apartment is covered in crucifixes and pictures of Jesus Christ, clearly the home of a very paranoid man. The two look around for a few minutes, finding nothing, before a shaken Nathaniel Williams steps through the door. The man drops his grocery bags on the floor, stepping back away from Blake with a terrified look on his face. It's clear that they've met before.
Norman begins speaking to the man, asking him general questions about himself and trying to calm him. But it's not long before Blake steps in, yelling and intimidating the man, who refers to him as the son of Satan. Upset with the blatant brutality, Norman intervenes, telling Blake to knock it off and defending the man. Until Nathaniel pulls a gun from his pocket and aims it at Blake's head. Jayden then draws his own firearm, locking the sights onto Nathaniel but reluctant to shoot. Eventually, he talks the man down, telling him that Blake is going to leave the planet and return to the Realm of Shadows, that he can't hurt him. Nathaniel drops the gun and Blake walks over to handcuff him. As he reaches the suspect, Nathaniel whirls around holding what looks to be a second weapon but is in reality a wooden cross. Remaining (slightly less than) calm, Jayden doesn't pull the trigger, which proves to be the right decision, as the man is not holding a gun.
After arresting the man and bringing him in for questioning, they're already off to see another suspect: Miroslav Korda. They confront Korda on the sidewalk outside of a supermarket. Blake approaches him by introducing himself and telling him that he'd like to ask him a few questions. Korda's response is to throw his coffee into Blake's face and make a run for it. Norman attempts to stay and make sure Blake is alright (because we all know about all those tragic coffee fatalities) but the lieutenant orders him to chase the suspect.
Norman is hot on the trail as Korda runs inside the market and attempts to escape in the confusion. Knocking over nearly everything and everyone in his clumsy path, Norman corners the man in a large walk-in meat locker. After much stumbling and falling to the ground, he finally has his man. Right? Not quite. As Norman looks around for him amongst the carcasses hanging from the ceiling, Korda lunges at him from the side, throwing him off balance once again. Norman fights the man and eventually ends up with the upper hand, knocking him to the floor and subduing him. As Norman keeps the suspect down, Blake recovers from the coffee to the face and walks into the room, ratcheting cuffs on Korda's wrists and leading him out the door.
They bring Korda back for questioning but find that he has solid alibis for more than one of the killings. He ran because he missed a meeting with his parole officer, not because he's been killing children. This enrages Blake but his manly tantrum is cut short when Ethan Mars' ex-wife Grace comes into the police station with some alarming information. She tells them that Ethan had once come home soaked with rain, speaking nonsense about drowning, rain, bodies in the water. And, according to Grace, another body was found the next morning.
Blake is content to arrest Ethan and charge him with the murders but Norman is convinced that he is innocent. He doesn't fit the psychological profile or the geoprofile (which tells the zone where the killer most likely lives). He thinks there's no way Ethan, a devoted father, would murder eight children and then go on to kidnap his own son. But with no other remaining leads, Blake and Captain Perry are unwilling to consider the FBI agent's protests.
Determined to nail Ethan, Blake brings Norman along with him to the suspect's therapist's office. When they arrive, they find the therapist, Clarence Dupre, unwilling to break his vow of doctor-patient confidentiality and tell the men anything that Ethan has ever said to him during a session. Though he's still adamant that Ethan is innocent, Norman assists Blake in trying to get the man to talk to them. Until Blake gets violent, that is. He punches Dupre in the face before shoving him hard enough to send him over the desk and onto the ground.
At this point, Norman defends the beaten man, shouting at Blake and shoving him away from the therapist. Norman demands that they leave, but at that point Dr. Dupre is finally willing to talk. He confirms what Grace told them, as well as showing them something that fell from Ethan's pocket as he was leaving from his latest session. An origami dog.
The information shared by Grace and Dupre send Ethan Mars shooting up to the top of the suspect list, and Norman and Blake are soon on their way to arrest Ethan at a seedy place by the name of the Cross Road Motel, though Norman is still unconvinced of Ethan's guilt. They follow Ethan to an apartment building on Marble Street, where they set up to catch him when he comes out. They see a young woman with short brown hair enter the building but think nothing of it, assuming she's a tenant. After some time, Blake gets tired of waiting and decides that they should go in and make the arrest inside the building.
As they enter the building, they see the woman who had entered earlier escaping out the window with Ethan Mars. Assuming she must have been an accomplice of Ethan's, they give chase. The pair runs toward a bustling subway entrance and it looks like they are going to get away. Or one of them is. When they're almost at the entrance, the officers have them surrounded. Panicking, the young woman abandons Ethan and runs into the crowd while the cops and Jayden are focused on Ethan.
As the woman escapes, they are able to successfully apprehend Ethan and bring him back to the station for questioning. It's Norman that conducts the interrogation of Ethan Mars. Mars remains silent for nearly the entire session, until he looks up from the metal table and tells Norman and Blake that, yes, he is the Origami Killer. He explains that he kidnapped his son but he doesn't know where he is, and the only way Shaun can be saved is if they release him so he can save the boy himself.
Blake, in a fit of rage at the ridiculous explanation, proceeds to punch Ethan in the face. Jayden protests, shouting at the man and trying to get him to stop beating the suspect. When that proves ineffective, he shoves Blake across the room, punching him. At this point, Blake pulls a gun on Norman, threatening to kill him if he doesn't get the hell out of the interrogation room. Furious, he hurries off to inform Captain Perry about Blake's unnecessary and very illegal brutality. Storming into the man's office, he tells him what happened (leaving out the fact that Blake threatened to shoot him in the face) and is horrified when the captain shrugs it off and refuses to do anything about it.
Storming back out of the man's office, he then heads into his own and slams the door, which only flies open once more until he shoves it closed and leans against it with his weight on his hands. Feeling that there's no more he can do for Ethan without the backup of the captain (if he doesn't want to get shot, that is), Norman sits down at his desk and delves once again into the digital world of ARI. He spends some time reviewing the evidence in his possession and finds that the Chevrolet Malibu '83, whose tire tracks he found at the crime scene, was reported stolen by a man named Jackson Neville, AKA Mad Jack. The charges were dropped for lack of evidence, but it still sounds like a pretty good lead.
He's about to leave his office and follow up on the Mad Jack lead, but as he reaches the door, he finds himself overcome by a crippling Triptocaine withdrawal. He does his best to control it but gives in, inhaling the blue powder and finding intense relief in it. Finally making it out of his office, he heads back toward the interrogation room. Opening the door, he finds Ethan Mars unconscious on the floor and still handcuffed to the table. Blake is gone but there's a police officer guarding Ethan. Telling the officer to leave them alone, he kneels beside Ethan, stroking his hair and asking him if he's alright before helping him back into his chair. Ethan tells him that he has to get out of there if he's going to save his son. Jayden assures him that he'll do whatever he can to get him out and then leaves to figure out a plan.
Well aware that no one is going to believe him about Ethan's innocence, Norman heads into the room adjacent to the one Ethan is in. Looking through the two way mirror leading into the room, he sees that the guard has once again joined Ethan in the interrogation room. Using the microphone on the desk, he tells the man to take a break; he'll take over the babysitter duty. The guard, of course, is fine with the idea of getting an early break and gladly leaves his post. Before exiting the office, the guard tells Norman that his handcuff keys are on his desk. Just in case he needs to adjust Ethan's cuffs.
Picking up a police poncho from the chair in the room, he walks over to the camera aimed at Ethan and turns it off. Heading out of the room, he walks over to the guard's desk; picking up the handcuff keys and slipping them into his pocket. Making his way back to the interrogation room, he closes the door behind himself and tells Ethan that he's going to get him out of here. Pulling the keys from his pocket, he reaches out to 'adjust' Ethan's cuffs. Unlocking them, he helps him up and gives him the poncho along with instructions to put it on.
He tells him that the guards are having a break and if he's careful, Ethan should be able to slip by unnoticed. Ethan doesn't know what to say in regards to Agent Jayden putting his career on the line to break him out of jail. Just don't say ehnethin. Jayden instructs, urging him out the door while there's still time.
Watching the man trudge out of the station, Jayden hopes he won't regret doing this. With Ethan freed, now he can focus on something that might actually help with the investigation, rather than interrogating someone he knows is innocent.
So now we're at Mad Jack's auto garage, hoping for a nice, simple interview with the guy. But that's not what we're getting. Jack is immediately defiant and refuses to answer any questions. After not too long, Jack heads off to junk some cars, leaving Norman alone in the garage.
Always his first reaction, Norman breaks out his ARI glasses and glove, slipping them on and having a look around the garage. He searches the entirety of the room and finds tire tracks that match the Malibu along with some blue paint that signifies that the car had indeed been in this garage. He also now knows what color of car he's looking for. As he's leaving the garage, ARI reveals a blood trail; lighting it up with its ultraviolet lights. Why would there be blood here? The trail leads to a tub in the corner that's filled with water. Lifting the cover from the tub, he sees a human skull floating in the water.
Appearing behind him, Jack pulls out a gun before Norman can get to his own, training it on the back of his head. They tussle and Norman manages to evade getting shot and turns the tables by aiming his gun at Jack, who falls to the ground against a stack of gasoline tanks. The man is still reluctant to talk until Norman threatens to shoot the gas tanks and blow the whole place to pieces. He'll just say it was an accident, he says. His tone is a bit crazed and this apparently scares Jack into telling him what he wants to know.
Jack admits that, yes, the car was here. He got it from 'a guy' and then later gave that guy a different car with false plates. But he doesn't know his name. He then tells Norman that he was supposed to tell a guy named Paco when the car was finished. Paco is the owner of the Blue Lagoon Night Club, he informs. Armed with all the information he needs to move on in the case, he moves to make an arrest on Jack but just then is stricken by another Tripto withdrawal. Vision blurring, he feels disoriented and lets the phial of the illicit drug slip to the ground, then falls down himself. With the agent already on his knees, Jack mocks his addiction before giving him a hard kick that sends him the rest of the way down. A second kick, to the head this time, knocks Norman into unconsciousness.
When he wakes up, Norman finds himself handcuffed to the steering wheel of his own car being lifted by a large machine. It's headed toward a car crushing machine with terrible threshing blades designed to tear apart metal. Norman doesn't stand a chance against it. Thinking quickly, he kicks open the glove compartment and gets hold of his secondary weapon, which he always stores there. Clumsily getting his finger around the trigger, he shoots the chain that binds him to the steering wheel and manages to make it through the broken out car window to safety just in time to avoid a gruesome death.
Finally, he's safe. But, wait: Jack's back! Jack comes at him and Norman has no choice but to fight back. The man kicks him to the ground and doesn't stop kicking. Norman manages to get hold of a piece of a destroyed car, throwing it at Jack before getting to his feet. Jack then gets him shoved up against a moving construction vehicle. In the midst of the fight, Norman gets away from it and the strap of Jack's undone coveralls gets stuck in the wheel of the machine. Norman watches without attempting to help as the man is fatally crushed under the continuous track wheel.
Following the lead given to him by Mad Jack, Norman then heads off to the Blue Lagoon Night Club to see Paco. He looks terribly out of place there and it's very awkward for everyone. When he first confronts the bouncer about seeing Paco, the man refuses. It's only when Norman shows him his FBI badge that he tells him where Paco can be found and lets him through. Crossing the crowded dance floor proves minorly difficult and he's relieved to reach the stairs on the opposite side of the club. He heads upstairs and reveals his badge once again to the man at the top of the stairs.
Walking down the short hallway to Paco's 'office', he opens the door and sees Paco sitting in a swivel chair facing away from him. Heading over to him, he turns the chair around to get a look at the man's face. Oh no, he's dead! The man has been shot once right between the eyes. Instant death. Disgruntled by the dead end (ha!) that has left his lead useless, he puts on his ARI glasses and turns to look around the room.
But, oh no! The killer's still here! He pounces from his hiding spot behind the door and attacks Norman, knocking the ARI specs as well as Norman's gun to the floor, before drawing a pistol of his own. Norman gets the gun away from him, dropping it, too, to the floor, and then proceeds to fight back with his fists. The killer reaches up and grabs a katana from a wall display, slashing at Norman with it and drawing blood before the agent manages to knock it from his hand. They fight hand to hand until the killer knocks Norman into a wall mounted fish tank, sending water, fish, shards of glass, and Agent Norman Jayden sloshing onto the floor. The killer escapes while Norman is trying to get up, but the agent notices that he managed to rip the pocket off of the man's jacket in the struggle.
He picks up the two receipts that fell from the man's pocket (both from the same gas station) and follows the killer out the door. By the time he gets out there, the man is nowhere to be seen. Turning to the doorman, he asks him if Paco knew the man who had come to see him. The man refuses to answer but when Norman slams him up against the wall and intimidates him, he doesn't mind telling him what he wants to know. According to the doorman, the man is a friend of Paco's and he was told to always let him in without question. He also tells him that the man's name is John. That's all he knows.
Satisfied with the information, Norman heads back into the room (which is now a crime scene) and picks up his ARI glasses, sliding his fingers into the coolness of the corresponding glove. Scanning the scene with ARI, he finds DNA and fingerprints from a woman named Madison Paige. A journalist. Now, why would she have been here? Maybe she's a witness. Aside from the receipts, he doesn't find anything else that will be of any help. Finished with the scene, he heads out of the room and out of the Blue Lagoon.
Back at the office, it's time to put together all the information we've collected so far and try to catch the killer. Opening ARI, Jayden realizes that the glasses were recording during his fight with the killer. Analyzing the video, he notices that the man is wearing a gold watch. The same watch that was on display on Charlene's desk. Same color, same model. He's disgusted to realize that the killer is, or was at one point, a cop. His first thought is that it must be Lt. Blake. That seems like a good explanation for his eagerness to nail Ethan Mars even with such a lack of evidence. He considers making an accusation but decides it would be better to look at the rest of the evidence before doing something like that. He has to be sure before he says anything. He then analyzes the receipts, finding no fingerprints or relevant purchases. Disgruntled, he thinks he might have hit a dead end. But then an idea comes to him.
Geoanalyzing the receipts (determining the location of the gas station they were bought from), he finds out where the gas station is located. Then he cross-analyzes the location with the residences of all current and former police officers in the city. There's only one within close proximity of the gas station. Scott Shelby. He looks into his records and finds out that he owns a warehouse near the docks. He stops to think. If he's wrong, there won't be enough time to save Shaun Mars. With no other leads to go on, he goes with his gut and heads out to the warehouse. On the way, he gets a call from Madison Paige - the journalist whose fingerprints he found in the recently deceased Paco's office. She tells him that she knows who the killer is and gives him an address (the same information he just figured out himself) but doesn't tell him how she knows it. Confused but now confident that he's headed in the right direction, Norman makes for the warehouse.
When he arrives, he sees Scott Shelby aiming a gun at - wait, what? - Ethan Mars. Ethan is facing away from him, trying desperately to open a metal grate covering a carved well in the floor. The area is open to the sky and the relentless autumn rain beats down on them. Oh, shit! Shaun must be in that well! With no time to think or make a rational decision, Jayden leaps on Shelby, tackling him to the ground and knocking the gun from his hand. Shelby is up quickly and getting away, but at least Ethan's safe. But don't worry, Origami's not going to get away that easily.
Jayden is in pursuit as soon as he's on his feet, following Shelby to the roof. Looking around in the heavy rain, he sees no sign of the killer and decides to step out onto a two foot wide shaft extending over the side of the building (for some reason). But, wait! The killer is right behind him, tackling him to the ground and knocking both of them over the side of the shaft. They land on a moving conveyor belt that's dropping rubble into a giant crushing machine (seriously, another one?).
Sans pistol, Norman fights the killer hand to hand, careful not to fall off the edge of the conveyor. A fall from this height would mean death, and the threat is looming throughout their scuffle. He falls on his back, picking up various pieces of rubble and metal and throwing them at his attacker. Nearing the end of the belt, Norman manages to get to his feet and climb onto one of the platforms on either side after throwing yet another piece of rubble at Shelby. The blow knocks the killer off of the platform and he's holding on with one hand as Norman makes it to safety. The Origami Killer begs Norman to help him up, to save him from the promised death below. Jayden nearly extends a hand to the pleading man but changes his mind, letting him fall into the crushing blades of the machine below. Staring at the now bloody blades, he feels relief wash over him. The Origami Killer is dead.
And now this.
Personality: Norman Jayden is a very confident man. He never second guesses or doubts himself, instead going about nearly everything with his head held high and his opinions stated openly. When he gives his working profile to Captain Perry and the Origami Killer task force, he speaks fluidly and informatively. With the life of a ten year old boy depending on his profile, Jayden is still completely sure of himself. He's done his research and finds no reason to doubt himself. He gives off a general air of confidence and esteem without having to say a thing. His effortless confidence and esteem have nothing to do with his Triptocaine addiction, as he acts this way regardless of whether he indulges in the drug or not. Whether he has just taken the drug or refrained every time the option is given to him, this aspect of Norman Jayden is the same.
Despite his confidence, Norman has a distorted self-image. His addiction causes him to be slightly less confident than he would otherwise be, as shown by the fact that he avoids looking in mirrors. This behavior is typical of addicts who are aware of the damage their vices are causing to both their physical and mental wellbeing. All other playable characters, when given the option to look in the mirror, will look at their reflections and seem to approve of their overall appearance. If placed in front of a mirror, as he is in the police station if the player chooses to enter the restroom, Norman will look off to the side, glancing at anything in the room other than his own reflection. This falter in his overall confidence is caused solely by his addiction to Triptocaine.
He is also rational, thinking things over in his head before making decisions (if possible). He considers every option before acting on one. When he first realizes that the killer is a cop, his first instinct is that it must be Carter Blake. It all makes sense and adds up perfectly. Also, they're getting desperate and running out of time to save Shaun. But, still, he decides to review the rest of the evidence before making a claim. It turns out he was wrong, and if he'd made the claim on impulse like he was about to, they may not have been able to get to Shaun in time. Due to his sensible decision making, he was able to assist Ethan in saving Shaun and stopping the Origami Killer. He also avoids killing Nathaniel because he represses the natural urge to pull the trigger, instead waiting until he understands the situation before doing anything he might regret. Having this attitude prevents him from killing an unarmed man in his own home. Norman’s rationality has nothing to do with his use of Triptocaine. The drug helps to keep his mind clear but does not affect his rational decision making skills. This is clear, as most of the major decisions made in the game are made by the player, and therefore may vary by player or even by playthrough. The same options are available whether Triptocaine is taken every time or not at all.
Norman also has a very addictive personality. This is shown by his crippling addiction to both Triptocaine and ARI. He abuses them greatly, to the point that he's near death. This is shown in gameplay during the last ARI session before going to the warehouse. If he remains in ARI for too long during this time, he will die from the overuse. In the Uploaded ending (which is achieved if Norman dies at any point in the game other than Smoking Mirror), Norman appears in ARI when the system is used by Lieutenant Blake. This shows that his ARI addiction is so severe that he has been literally uploaded into the program. As far as Triptocaine goes, he tries to resist the cravings but they still continue to get the better of him. He sometimes has to physically force himself not to take it, and even that doesn't always work. He is heavily dependent both mentally and physically on the drug, which is shown by the sheer intensity of his withdrawals. His hands shake uncontrollably and he can barely stand up, (these along with the symptoms listed in the History section). The true extent of his addiction is shown in the Smoking Mirror ending, in which he dies from a Triptocaine overdose after failing to save Shaun Mars. It shows that he’s so close to the edge that one serious failure is enough to send him over it.
Jayden feels little connection to the real world, preferring instead the virtual world of ARI. Whenever he has a moment of free time or time to himself, he spends it inside the ARI world. When waiting for Captain Perry after he searches the first crimes scene, he enters ARI to do something as unentertaining as throwing a virtual ball at a virtual brick wall. This is something that could easily be done in the real world but he still prefers to reside inside of ARI. He's gone so far as to make friends with a virtual figure. In the chapter "Jayden Blues", he is seen playing a grand piano and having a conversation with a butler. This is basically the only not completely work-related conversation he has during the game and he seems very comfortable with the digital man. The butler brings him vodka, insinuating that Norman had previously asked for it. Doing things like drinking alcohol whilst inside a virtual world shows a sort of comfortable dependence on it. Alcoholic beverages consumed in ARI would have no effect on him in the real world and yet he still indulges in them. He treats ARI as if it's the real world rather than a simple filing system as it should be seen. Triptocaine helps to dull the effects of ARI, which makes it easier for Norman to ignore the damage the system is doing to his physical and mental health. The drug helps to eliminate the hallucinations caused by overuse of ARI, therefore making it possible for him to deny the ill effects and continue his excessive use.
Norman has a strong moral sense. He would much rather do what's right and what will best help with his work than what's legal. He risks everything - his career, and quite possibly his freedom - to break Ethan Mars out of the police station because that's what he feels is the right thing to do. He believes that it's the best way to save Shaun Mars and he barely has to hesitate before putting his plan to action. There's no guarantee that Ethan was even telling the truth about being able to save Shaun, but Norman goes with his gut. His instincts and moral capabilities are in the end what saves Shaun's life. It goes without saying that Norman’s moral values come from the core, and have nothing to do with his drug use. He knows what’s right and will act on those impulses regardless of their legality or consequences.
There is no end to Norman's impatience. He needs near constant stimulation to remain entertained and that stimulation usually comes from ARI. When he's waiting to meet with Captain Perry for the first time, he sits outside the man's office for no more than five minutes and boredom is already overtaking him. He has a few little habits that come up when he's bored or has to wait for something. He makes an array of irritating sounds with his mouth, crosses and uncrosses his legs, and nearly constantly shifts from one position to another. After a few minutes, he escapes into ARI. The real world holds little for Norman Jayden. His impatient nature has nothing to do with Tripto, and is merely part of his collective demeanor. He is easily bored, which may be (or have been at one point) an excuse to take Triptocaine, but that is the only extent to which those two aspects of his life are linked. Tripto is not the cause for his impatience, nor is his impatience the reason he takes Tripto.
Norman is a very theatrical person, and he's not afraid to show his emotions. If he feels strongly about something or has a strong emotional reaction, everyone will know about it. When Blake is abusing Ethan during the interrogation, Norman gets angry enough to become physically violent with the man. Then when Blake pulls the gun and threatens Norman, he deliberately kicks one of the two chairs over, picking up the other one and throwing it across the room. His emotions sometimes get the better of him, such as in that situation, and can cause problems. His bursts of rage are characteristic of his personality, and not caused by Triptocaine. Any violent and/or enraged outbursts are controlled by the player and therefore cannot be completely a result of Triptocaine, as the option is present whether or not the player chooses to let Norman indulge in the drug. However, Triptocaine withdrawal does worsen his temper issues and make him more liable to have an outburst. The drug doesn’t cause his short fuse, but rather enhances it.
Agent Jayden is also a major workaholic. He doesn't eat or sleep until it becomes absolutely necessary while he's working on a case. Throughout the game Heavy Rain, all characters are shown doing things like showering, eating, sleeping, and generally going about their lives. But not Norman Jayden. The story takes place over several days and he never eats or sleeps, and is never doing anything besides working on the case. He doesn't have a single conversation or even thought (the player can check the characters' thoughts at any given time) that doesn't center around the investigation. It even comes up when he's talking to his good friend ARI butler. Triptocaine does not cause his obsessive nature when it comes to work, but it does help him keep a clear head while he’s doing it. Tripto withdrawals cause him to become disoriented and therefore cause his work to suffer. If he indulges in it, he can focus again and get back to catching killers.
Abilities, Weaknesses and Power Limitations: Strengths/Abilities: Profiling - Norman is an FBI profiler, so figuring things out about people comes naturally to him. It's not as if he could tell your favorite song just by looking at you or read your mind or anything, just good old fashioned profiling. It's easier for him to read people than it might be for some others.
ARI - He's skilled with the ARI system and can use it to his advantage, programming whatever he wants into it and pulling it up at any time. Might not qualify as an 'ability' but... there it is :P
Evidence/Crime Scenes - Norman is skilled at handling crime scenes and evidence. He can weed out anything that is unimportant and focus on relevant information and evidence that could help solve whatever case he's working on at a given time.
Evading - While Norman is terrible with combat, he's very good at dodging and keeping away from the blows of his opponents. That's the one thing that often keeps him from getting killed.
Strategy - Norman uses strategy to get himself out of unfavorable situations. When Mad Jack handcuffs him to his own steering wheel and attempts to dump the vehicle in the trash compactor, Norman uses his quick thinking and strategic skills to save himself by kicking open the glove compartment and getting his gun to shoot the chain that binds him to the car.
Improvisation - During fights and in general situations, Norman is very good at improvising. When he loses his weapon in a fight, he's quick to pick up any random object and use it to his advantage. Also, when breaking Ethan out of jail, he improvises by disguising him in a police poncho. He utilizes this skill in almost any situation possible.
Weaknesses: Combat - Norman is terrible with hand to hand combat. It's quite obvious that he's never actually done any field work prior to the Origami Killer case. He frequently drops his gun or gets it knocked from his hand by opponents. He rarely ever has the upper hand until the end of the fight, and that sometimes only happens by sheer luck. When he's fighting Mad Jack, he only wins because Jack gets caught in one of his machines and is crushed. The fight with the Origami Killer at the Blue Lagoon only ends because the man leaves while Norman is incapacitated.
Reality - Norman has trouble dealing with reality. He spends every possible moment in ARI rather than dealing with life head-on like a normal person. He uses it as an escape and something like a second home. He feels a lot more comfortable in his digital haven than in the real world and it's becoming increasingly unhealthy. If he spends too much time in ARI before he goes to the warehouse, he will die from the overuse. He's risking his life just to escape from a reality that holds nothing for him.
Addiction - A major weakness is his dependence on ARI and Triptocaine. He can't live a normal life anymore without them and it's taking a toll on his health. During his multiple Tripto withdrawals, he becomes pale and sickly looking. His vision blurs and he can barely walk if he doesn't satisfy the urge. He can't even function without the drug anymore. It also gets in the way of his job. He would have been able to arrest Mad Jack without much of a fight if it hadn't been for his sudden onset of withdrawal symptoms. We already delved into how much he cares about his job, and he even lets the drugs get in the way of that. Also, the withdrawals seem to happen more and more frequently throughout the story. Before he releases Ethan, he has a withdrawal. The incident with Mad Jack is less than an hour after that and he has yet another. This addiction is clearly getting out of hand. The ARI issue was already basically covered in the Reality portion.
Butterfingers - Norman has a bad habit of dropping things, especially things that are very important. In the fights with Miroslav Korda, Mad Jack, and the Origami Killer (in the Blue Lagoon as well as on the warehouse roof) he drops his gun. In the fight at the Blue Lagoon, he also drops his ARI glasses. And when he's trying to arrest Mad Jack he drops his vial of Triptocaine, which would have relieved the withdrawal effects and saved him from almost being crushed. Norman just can't hold onto anything.
Inventory: ARI glasses and glove, Triptocaine (3 vials), pistol, clothes, I guess that's really all he has...
Appearance: Brown hair, light green eyes, scar on right cheek, 5'9"-5'10" (according to wiki!) Here's some pictures!
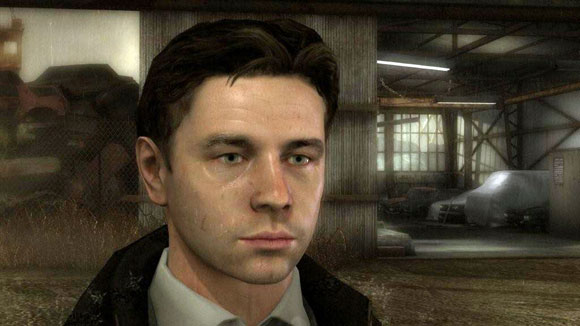
Age: 34
AU Clarification: None :P
S A M P L E S
Log Sample: Raining. It was still raining. The sky was dull and gray with heavy clouds that completely obscured the sun. And the relentless rain continued to beat down on the window of his hotel room.
The small vial was nearly weightless in his trembling hand. Tiny and light, yet so significant. The slightly luminescent blue powder seemed to smile up at him from his sweating palm, enticing and just too easy to give into.
Sighing, Norman let his arm sag down between his knees, hand dangling limply in the air and barely clutching the vial. How had he let it get this bad? In the beginning, it was a perfect setup. ARI was a revolutionary system, but it had its flaws. Triptocaine dulled those flaws, sometimes outright getting rid of them. But he'd found that it took an increasing amount of the drug to rid him of the harrowing visions caused by the system. And so he took more. And more. More often until it was multiple times every day.
And then he'd realized that that wasn' even the reason he was doing it anymore. He hadn't had a hallucination in months, yet he still indulged in the drug day after day. And in ARI, too. At first it had been just a tool. Just a thing that made his and others' work more effective. But then he'd realized that there was more to be found in ARI than just evidenciary information. There was a whole world inside the program. A world much better than the one he had previously resided in solely. A world where he didn't have to spend all his time at work looking over pictures of dead bodies and bloody weapons. A world where outside of work he didn't have to be completely alone. A world that was friendly to him, unlike the cruel reality that he'd lived with for most of his life.
His parents had been kind, wonderful people, from what he remembered. The orphanage had been fine. Not perfect, but a moderately comfortable life. And then came the first loneliness. He'd left at eighteen, just like everyone else. He'd gone out into the world with no one to turn to and nothing to show for his life. A few months later had been college. During those four years the loneliness subsided and was replaced by roommates and parties, beer and studying. Then, with a psychology degree to show for it, it was over. And then came the Bureau. And the return of the loneliness.
And with the combination of those two things came the drug. Commonly used to combat the ARI effects at the time, it was practically handed to him. ARI and Triptocaine together created the perfect world for him. ARI whenever possible, and Triptocaine when his eyes started to bleed from the overuse of ARI. And then more Triptocaine when his nose started to bleed. When his hands started to shake.
He still loved that world he'd enveloped himself in but it was time to stop. He knew it was time to stop but he just couldn't handle life without an escape. He glanced across the room at his already packed suitcase. The Origami Killer was dead, the case was solved, and he'd be returning to Washington later that evening.
A knock at the door startled him, and he rose to answer it. Probably some hotel maid or room service kid.
But when he opened the door, it was neither of these options. "Ethan." He said, surprised to see him.
The man looked awkward, rubbing a hand over his dark brown hair. "Um, hello, Agent Jayden." He didn't seem to have anything else to say and Norman wondered what he was doing here. And how he'd figured out where he was staying, for that matter.
"Is there somethin' I can do for ya?" Norman's fingers drummed habitually on the doorjamb. He'd been in the ARI world playing his piano earlier and his fingers were still used to the motions.
The man looked like he wished he hadn't come and Norman wondered if something had gone wrong. "I just wanted to come by, and uh, say thank you. For everything." He smiled awkwardly, maintaining eye contact but with a bit of trouble.
"You don't have to thank me, Ethan." He responded, smiling back. "I was just doin' my job."
The man shook his head adamantly. "No, you did so much for me. For Shaun. Thank you."
Norman's smile warmed slightly. It was always nice to be recognized for the good things rather than the bad. "No problem, Ethan. How's Shaun?"
Ethan nodded, glancing past Norman into the room. It was a nice hotel room, paid for by the Bureau. "H's fine. Great, actually. He's out of the hospital and everything."
"Hey, that's great." Norman leaned against the doorjamb. "Do you wanna come in or ehnethin?"
"Oh, thank you, Agent, but I really can't stay." He paused, seeming guilty about not accepting the invitation. "Gotta get back to Shaun. He's with Grace right now, but... I really ought to be there, too."
Norman nodded, smiling again. "Yeah, wouldn't wanna keep the kid waiting."
"But, really, thank you so much for everything you did for us." He looked truly grateful.
"Really, it was no problem." He was slightly overwhelmed by so much gratitude. "You take care, now, alright?"
"We will." Ethan gave him one last smile before turning and heading off down the hall.
Norman watched him until he turned the corner leading to the elevators, then closed the door gently. He remained where he was for a moment, then walked back to the bed and dropped heavily onto it. Pulling the vial again from his pocket, he stared at it for a moment before getting up and walking into the bathroom.
Without much hesitation, he let the vial slip from his fingers and splash into the stagnant water that filled the bottom of the toilet. He hit the flusher and watched it disappear from view. There was good in this world, even if it was more difficult to notice. He smiled as he thought of Ethan and Shaun, no doubt grinning ear to ear just to be with each other right now. Maybe he could be happy in this world as well.
Heading back into the bedroom, he sat down on the bed and stared at the streaks of sunlight that leaked in through the rain-pelted window.
Comms Sample: [Video]
[Norman comes into view still wearing his ARI glasses. He smiles but in a more professional than friendly way.]
Good mahnin'.
[He greets in his hybrid accent.]
I'm lookin' for information, here. Tryin' to figure out how we all got here and why.
[Reaching up to his face, he removes the glasses, realizing that he still has them on. His eyes are red rimmed and he looks tired.]
If anyone knows ehnethin, I'd appreciate a little help here. Take care.
[End feed.]